To load a roll of tags in the GoDEX tag printer:
- Open the GoDEX Printer by pushing in on the circles on either sides of the printer and pulling up.
- Find the two green buttons on the ribbon supply. Push both of them in at the same time. This should release the ribbon supply.
- Lift up the ribbon supply to reveal the tag feed.
- Toward the back of the printer behind the ribbon feed are two green plates on a bar. Lift that bar to remove the tag holder.
- Slide the green tag clamps off the tag holder bar. Now slide the roll of dumbbell tags onto the bar with the tags facing up when they roll out.
- Slide the green tag clamps back on either sides of the roll of tags with the smooth side facing in. Using the clamps, center the roll of tags in the middle of the bar.
- Lift the ribbon supply up and feed the tags underneath the ribbon supply. Spread the green clamps that are located underneath the ribbon supply so that you can feed the tags through the clamps.
- Now close the green clamps so that the tags fits perfectly in between them. Now feed the ribbon further so that the end of the ribbon reaches out side of the printer.
- Close the ribbon supply and use the green wheel of the left side of the ribbon to retighten the ribbon feed.
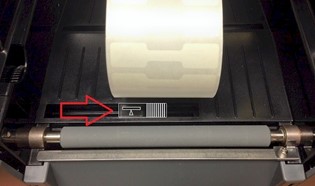
- When loading string tags or dumbbell tags without black mark on the GoDEX, the sensor on the printer must be placed on the left side of the tag.
Once tag roll has been installed, you will then need to calibrate your GoDEX printer.
For steps on how to calibrate your printer, please click HERE.