Once you have successfully completed downloading and installing The Edge software on your workstation, the next step is to configure the workstation to your SQL Database.
To do so:
- Click Start > Programs > Abbott Jewelry Systems > Administrative > Configure The Edge to open the Configuration window.
NOTE: Alternatively, you may instead type "Configure the Edge" into your Taskbar's search window to open the same Configuration window.
- Find the section labeled Database Settings. This is where you will specify the locations of the database file.
There are two sets of database settings: Production and Test:
• Production is for standard day-to-day operations.
• Test is useful for training and other non-production situations. When Test mode is in operation, a large watermark will appear on your screen.
- From the Database Settings area, Production Settings line, select the browse dots.

- The Database Configuration window will appear.
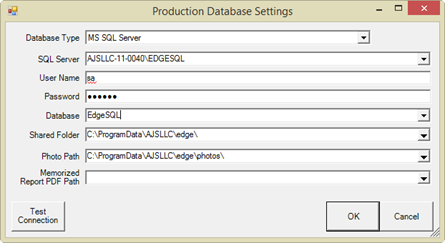
- From the Database Type drop-down menu, select MS SQL Server. The Production Database Settings window for SQL will appear.
- Complete the fields as described below:
a. Database Type: Keep MS SQL Server.
b. SQL Server: Locate the SQL Server instance using the drop-down menu.
c. User Name: Enter sa (case sensitive) unless instructed otherwise.
d. Password: Enter your SQL server password provided by Edge Technical Support during your SQL installation.
NOTE: If you have forgotten your password, contact Edge Technical Support.
e. Database: Select the database name from the Database drop-down menu. The default is EdgeSQL.
f. Shared Folder: This is the shared folder on your server used for database files and photo. Enter the path (e.g., \\servername\sharefolder\) or click directly on the DatabasePath line and browse for it. This should be the path to the database folder created and shared on the server during server configuration.
NOTE: If you are unsure of the path for your shared folder, check this setting on another Edge workstation already configured that is running SQL Server.
g. Photo Path: The PhotoPath refers to a folder that will hold all of your images for The Edge. It is strongly recommended you keep this in the same location as your database. By default, The Edge creates a photos folder with sample images in the default data path. Type in the path to the photo folder (e.g., \\servername\sharefolder\photos) or click directly on the PhotoPath line and use this button to browse for it. This should be the path to the photo folder created and shared on the server during server configuration.
h. Memorized Report PDF Report Path: Contains the location where PDFs of memorized reports will be saved. Keep the default unless instructed otherwise.
NOTE: The PDF folder needs to be created by you, as it is not automatically created by default as the photo folder is. Create a PDF folder in the same location as your photos folder and enter the path in this box. (e.g., \\servername\sharefolder\PDF).
- Use the Test Connection button to test access to the specified SQL Server folder, user name, and password.
- Select OK twice to return to The Edge Configuration screen.
- Find the section labeled Station ID.

- Change the StationNumber to the next available consecutive number. Remember that your license defines how many workstations can access The Edge simultaneously.
- Enter the appropriate store number.
- Select OK to save your changes.
NOTE: To avoid database corruption because of network failure, we highly recommend that you disable power save features on the network interface card (NIC) and on each PC in your network.
Operational Reminders
Once the workstation is functioning, you may need to configure peripheral devices such as a scanner, camera, and tag printer.
In Edge, go to File > Printer Setup to set up your receipt, report, and list printers.
- Margins must be manually set to 0.25 inches on all sides.
 These printers must be setup in Edge even if you are are only intending to view reports, but not intending to print from this station. Edge report previews are pulled from Edge printer settings, as well as from your Windows Default Printer selection. You may encounter errors and/or margin issues when pulling reports if this step is skipped.