Manual Uploads
If you wish to run the EdgeTPW.exe manually or outside the schedule:
From a command line, for example, type C:\Program Files (x86)\ajsllc\Edge\EdgeTPW.exe.
We recommend creating a desktop shortcut to the TPW execution.
To do so:
- Right click anywhere in the desktop and from the context menu, select New > Shortcut. The Create Shortcut window will appear.
- In the Type the Location of the Item field, for the default location, enter C:\Program Files (x86)\ajsllc\edge\EdgeTPW.exe.
- Select Next. You will be prompted to name the shortcut.
- Enter a meaningful name such as Upload to Website Now and select Finish.
Scheduling Uploads
After configuration, TPW can be run on a scheduled basis using Windows Task Scheduler.
For information on how to use the Windows Task Scheduler, see the section labeled Windows Task Scheduler. Specifically for TPW, schedule EdgeTPW.exe to run daily.
Marking Items for Upload
Once you have set up upload instructions for the site, new items will be automatically included unless you specify otherwise in the item record. The Website tab will appear in the Item Add screen. Complete these fields to provide item-specific instructions for upload.
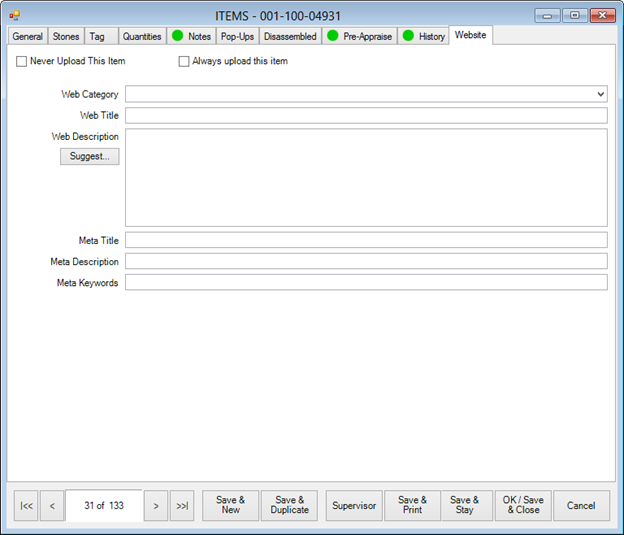
Fields and options in the Web tab include:
|
Never Upload This Item
|
Indicates that the item should never be included in TPW uploads.
|
|
Always Upload This Item
|
Indicates that the item should always be included in TPW uploads. Use this option with caution; when it is enabled, the item will remain on the website until you remove the check. Always Upload This Item is typically used on fast selling items that you always want displayed on the website regardless of whether the item is in stock.
|
|
Web Category
|
The category from the website into which the item should be put. This may not be the same as The Edge category.
|
|
Web Title
|
The title of the item as it will appear on the website.
|
|
Web Description
|
The description of the item as it will appear on the website. By default, this will be the description that appears in the item record, but you can make changes as needed.
|
|
Meta Title
|
The item title as it should appear in the page's HTML meta tags.
|
|
Meta Description
|
The item description as it should appear in the page's HTML meta tags.
|
|
Meta Keywords
|
Search terms with which to associate this record. Enter as many as you like, but separate them with a comma.
|
 A full upload is required anytime the Always Upload or Never Upload boxes are selected or deselected. Also, you should contact the web company to inform them that those settings were used. They will not automatically populate anywhere on the website until it is configured on the web provider’s end.