The easiest way to sell an item is to scan its barcode at POS. This will create a new sale line for the item. You can also use the Sell Item button to manually key an item in.
NOTE: If scanning you can skip to step 4.
- Open POS.
- Select the customer and click the Sell Item button. A new sale line will appear.

- Key in the item number or use the Find/New button to either search for the item or to enter a new item. The item details will appear on the sale line.

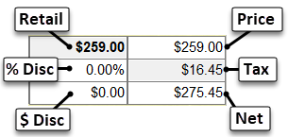
- The fields on the right control pricing and discount:
|
Retail
|
Retail price of this item; cannot be changed here
|
|
% Disc
|
Percentage item is discounted from retail; you can edit this to apply a discount
|
|
$ Disc
|
Dollar amount item is discounted from retail; you can edit this to apply a discount
|
|
Price
|
Current selling price; you can edit this to set a selling price; discount will be automatically calculated
|
|
Tax
|
Tax collected on this item as defined by your tax setup; cannot be changed
|
|
Net
|
Price plus tax (i.e. "out-the-door price"); you can edit this to set a final price and the system will calculate other fields accordingly
|
- Edit pricing as desired.
NOTE: When you update one pricing field all other fields re-calculate automatically.
- Continue with sale or, if complete, enter payment details and click Done.