The (Asset) account is a contra-asset account that posts an off-setting credit for the value of every item entered into The Edge. As vendor invoices are entered into The Edge, the exact value of items entered should be posted into this contra-asset. If all inventory items are accurately entered into The Edge and all bills are accurately entered into QuickBooks, this account should be 0. It is best to update this account every time vendor bills are entered into QuickBooks. When a stock or special order inventory item is added to inventory, the cost of that item is debited to an inventory asset account and credited from this general ledger account.
This is a contra-asset account that must be manually maintained. When inventory is entered into The Edge, the cost of the item is credited to this account. When entering the vendor bill in QuickBooks, you must debit this account to decrease the balance to $0.
Procedure
NOTE: Be mindful of deleted items: If an item is deleted because it was entered in error, The Edge will post an exact opposite entry as was posted when the item was added.
When you enter inventory in The Edge, it debits InventoryEdge and credits InventoryQB.
When you enter the vendor bill in QuickBooks, it debits InventoryQB and credits Accounts Payable.
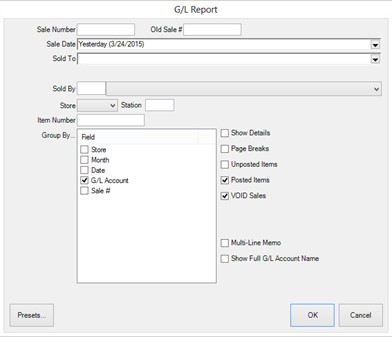
- Go to Administrative > QuickBooks > G/L Report.
a. Select the date for which you are posting.
b. Group by G/L Account.
c. Select Posted Items, and Voided Sales.
d. Select OK.
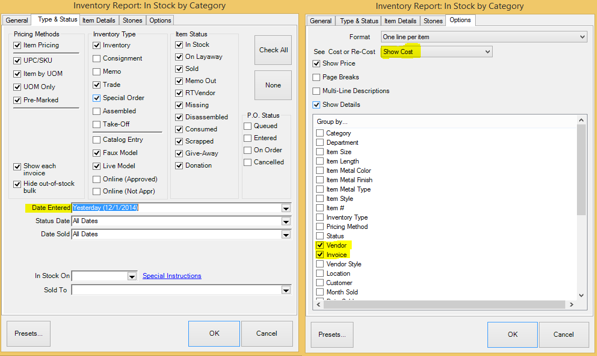
- To find out what vendors and invoice numbers you entered for the day, go to Reports > Inventory > In Stock by Category.
a. In the Type & Status tab, select all of the pricing methods and item types.
b. Check all of the item status because an item could have been immediately sold.
c. Enter the date the items were entered.
d. In the Options tab, select One Line per Item and Show Cost.
e. Uncheck Page Breaks.
f. Group by Vendor and Invoice Number.
g. Select OK. This shows the items that were entered and, therefore, which bills need to be entered in QuickBooks.
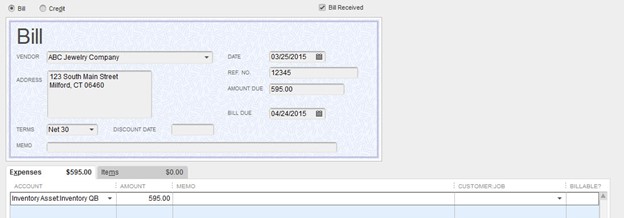
- Go to QuickBooks, and select Vendors > Enter Bills.
a. Enter the vendor name, the date of the invoice, the invoice number, the amount of the invoice.
b. Enter terms, and select the account, Inventory QB.
c. Anything on the invoice above the cost of the item is probably shipping; put that into Freight In.
NOTE: Manually adjusting quantity down will post to QuickBooks as an item deletion. This manual adjustment is appropriate if you're correcting an entry error that just occurred.
If an adjustment is being made to an existing bulk inventory record, use the Supervisor menu and choose Return to Vendor, Missing, or Scrap.