To access Calendar Settings:
- Click the Calendar button in the top menu. The Store Calendar will appear.
- In the top right, click the Settings button (gear icon). The Calendar Settings window will appear.
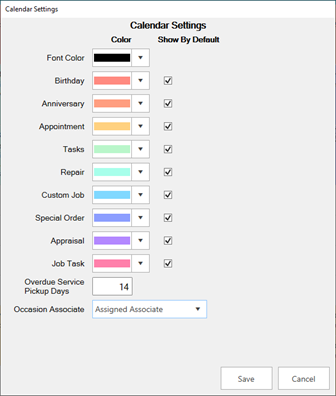
- Use the Color drop-down to change the color used for each element of the calendar.
- Use the Show By Default checkbox to determine which occasions and services appear on the calendar by default. These can always be changed on the fly from the main calendar view, too.
- Service Done Days defines the number of days a service job must be overdue before it starts appearing on the calendar, e.g. enter '14' if you want jobs to show up as overdue once they have been completed but not picked up for 14 days.
- Occasions Associate allows you to determine which associate is assigned to each customer. There are three choices:
| Assigned Associate |
Associate manually assigned on the customer record’s Other Keys tab. |
| Last Transaction Associate |
Associate that last processed any type of transaction for this customer. |
| Last Merchandise Associate |
Associate that last processed a merchandise sale or service intake. |
- Make any desired changes, then click Save.