Using The Edge's Customer Find Filter, you can generate mailing labels for all customers in the system or for a specific selection (e.g., those who have purchased diamonds within the last year).
 Our default format conforms to the Avery 5160 Labels.
For a video tutorial about working with customer filters, click here.
To create mailing labels:
- Select Labels from the Clientele menu. The Print Customer Labels window will appear.
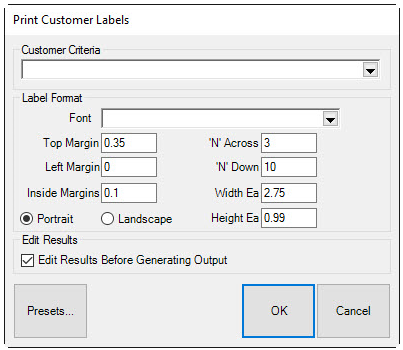
- Select the Customer Criteria drop-down menu to access the Customer Find filter. Use the Other Keys tab to select an existing Group / Mailing List or enter criteria to refine your select now.
NOTE: Selecting OK without entering any criteria will prompt The Edge to prepare mailing labels for everyone that has a preferred mailing address. A mailing will not include customers without a preferred mailing address.
- Use the fields in the Label Format area to format the label.
|
'N' Across
|
The number of labels that run across the printed page.
|
|
Width Ea
|
The width of each label.
|
|
Left Margin
|
The left margin of the page.
|
|
'N' Down
|
The number of labels that run down the printed page.
|
|
Height Ea
|
The height of each label.
|
|
Top Margin
|
The top margin of the page.
|
|
Inside Margins
|
The margin on each edge of each label.
|
|
Portrait
|
Indicates that the page containing the labels is in portrait orientation, i.e., taller than it is wide.
|
|
Landscape
|
Indicates that the page containing the labels is in landscape orientation, i.e., wider than it is tall.
|
|
Font
|
Returns a standard font dialog.
|
- Select OK. A list of customers to include will appear.
- Check the ones you wish to print.
- Select OK to preview the labels before they are printed.
- Select the Print from the lower left corner of the preview window to print the labels or select Close to go back and edit the list.