There are three ways to add Wishes to a customer's Wish List:
- Wish List Entry Mode
- Save to Wish List
- Customer Display
Wish List Entry Mode
This places the POS screen into a special mode that can be used to add Wishes to the selected customer. Unlike Save to Wish List, this can be used to add out of stock and non-inventory items, or even just rough ideas of potential wishes.
To add Wishes using this method:
- Go to POS and Find the customer.
- Click Wish List > Wish List Entry Mode. Non-relevant buttons will be hidden and a new Wish List Item button will appear at the top.
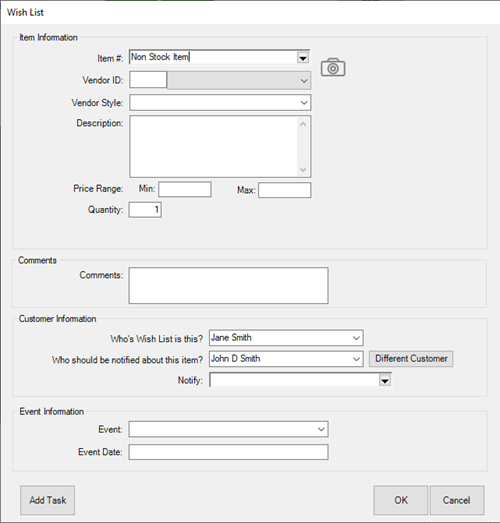
- Click Wish List Item. The Wish List window will appear.

Fields in this window include:
| Item # |
Defaults to Non Stock Item. Use the drop-down if you want to find a stock item instead. |
| Vendor ID |
Select the vendor for this Wish. |
| Vendor Style |
Enter a style or use the drop-down to select an existing. |
| Description |
The description of the wish. This, along with Who's Wish List is this? are the only required fields; all others are optional. |
| Camera Icon |
Opens the camera control where you can acquire, or select, an image for this Wish. |
| Price Range |
Set the customer's desired spending range. |
| Quantity |
Specify the customer's desired quantity. |
| Comments |
Enter any comments or notes. |
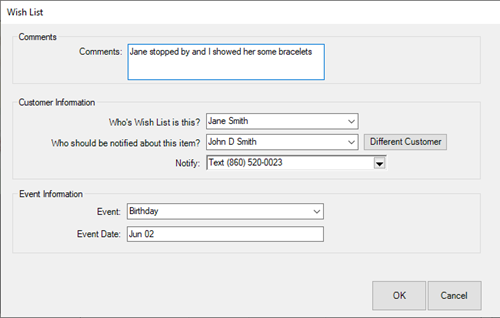
| Who's Wish List is this? |
Select who this wish is for: the customer, their spouse/partner, or type in anything you want, such as daughter. |
| Who should be notified about this item? |
Who to call, text, or email about this Wish List. Select the customer, their spouse, or type in anything you want. To link this to another customer, use the Different Customer button. |
| Notify |
How to Notify the designated person. |
| Event Information |
Select the event and date this Wish is for. |
- Complete the form as desired, then click OK.
The only required fields when entering a Wish are Description and Who's wish list is this.
Save to Wish List
This can be used to save items that were scanned or entered into POS, but not sold. It only works with in stock items. To add out of stock or non-inventory items use one of the other two methods.
To add Wishes using this method:
- Go to POS and Find the customer.
- Enter or scan the items as if you were going to sell them.
- Click Save to Wish List in the bottom right. The Wish List window will appear.

- Use the Who's Wish List is this? field to designate who this wish is for by selecting the customer or their spouse from the drop-down OR typing in any value you like, such as daughter.
- Optionally, fill in other fields, then click OK to save this to the Wish List.
All Wishes saved this way will share the same Comments, Customer Information, and Event Information that was entered.
Customer Display
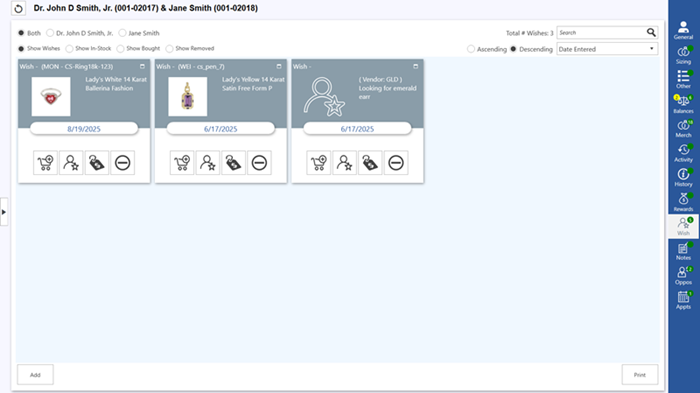
Wishes can be added directly from the Wish tab of the Customer Display.
The
Customer Display is a
sidebar that appears on the right hand side of POS and contains tabs for working with the customer's record. We
strongly recommend enabling this by turning on the
System Option Show Customer Display.
To add Wishes using this method:
- With the Customer Display enabled, go to POS and Find the customer.
- On the right, click the Wish tab. The Wish List panel will slide out displaying current Wishes.

- Click the Add button at the bottom. The Wish List window will appear
- Complete the fields the same way described above in the Wish List Entry Mode section, then click OK.