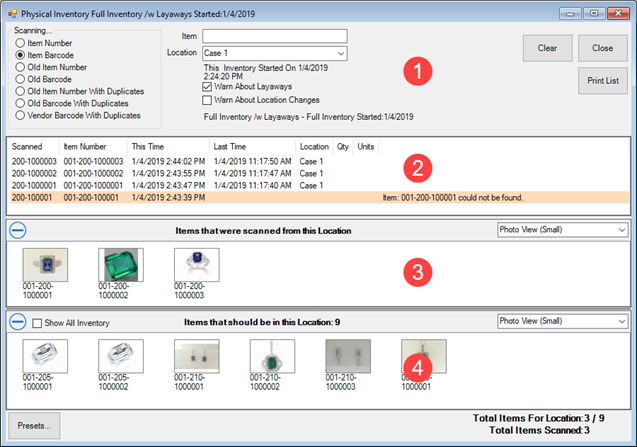
Upon creating a new inventory, The Edge will automatically open the Scanning window. This is used to inventory your items. You can manually get to this screen using Inventory > Physical Inv > Continue Inv.
To inventory your items:
- In the top left, choose how you will be inputting items for inventory (e.g. barcode, item #).
- If using locations, choose the location you are working with, then input all items. Repeat for each location.
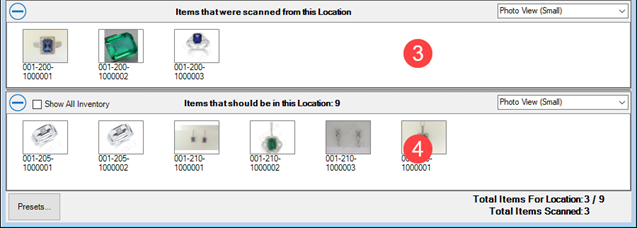
- Notice as you input items the activity log (second panel) updates. Any warnings or errors will display here. The bottom two panels also update to show items inventoried and outstanding.
- You can close and continue this process later at any time. Use Inventory > Physical Inv > Continue Inv to resume an in progress inventory.
- Once all items inventoried, see Step 3 – Review the Reports to begin the final steps.
Step 2 Tutorial Video
Scanning Window Overview
The Scanning window is divided into four sections:

The top section lets you specify input options.

|
Scanning…
|
Choose how to input items:
|
Item Number
|
Manually key item # into Item field.
|
|
Item Barcode
|
Scan barcode into this screen.
|
|
Old Item Number
|
Manually key item # from previous software (conversion).
|
|
Old Barcode
|
Scan barcode from previous software (conversion).
|
|
Old Item Number with Duplicates
|
Manually key item # from previous software where multiple items can have same number (conversion).
|
|
Old Barcode with Duplicates
|
Scan barcode from previous software where multiple items can have same barcode (conversion).
|
|
Vendor Barcode with Duplicates
|
Scan barcode from vendor where multiple items can have same barcode.
|
|
|
Item
|
Use this field to manually key in item # or old item # (depending on Scanning setting).
|
|
Location
|
Use this drop-down to select a location. Inventorying an item will move it to this location.
|
|
Warn about Layaways
|
If checked, items on layaway will generate a warning when inventoried.
|
|
Warn About Location Changes
|
If checked, inputting an item to a location different than the one currently on file will result in a pop-up window asking you to confirm moving it to the new location.
|
|
Clear
|
Use this button to clear the form. It does NOT undo any inventory activity.
|
|
Close
|
Use this button to close the window. It does NOT undo any inventory activity nor does it finish or close the inventory.
|
|
Print List
|
Use this button to print either the middle or bottom lists.
|
The next section keeps a running log as you input items. Errors and warnings will also appear here.

The bottom two sections show items that were inventoried as well as those items that are still outstanding. By default, the outstanding items for the selected location will be shown. To see all items, check the Show All Inventory box. This may negatively affect performance based on the number of items in the inventory.

NOTE: You can view an item’s record by double clicking on it in the window. In addition to seeing its details, this can be useful if you accidentally inventory an item as you can use Supervisor > Remove Last Inventory Date to un-inventory it.
As mentioned, see Step 3 – Review the Reports to begin the final steps of the Physical Inventory process.