By default, all tasks on a repair must be marked as done before it will be available for pick up. Tasks can be individually marked as done or, if you scan/enter the job or envelope #, you have the option to mark all tasks done at once.
There are four ways to complete a repair:
- Mark Services Done: Scan or enter specific task # or job #
- Repair Edit: Use Done Task button for specific task or enter done date for entire job
- Move Envelope: Move job envelope to a location setup to mark entire job as done
- Already Finished: 1-step repair job completed immediately at POS in a single transaction
NOTE: The "Repairs Pick Up Only When Marked Done" System Option controls this requirement. Set this to false to pick up repairs at any time. Doing so will mark the repair as done at the same time it is picked up.
Mark Services Done
The Services > Done button allows you to quickly mark one or more tasks, jobs, or envelopes as done. See Mark Services Done for more information.
Repair Edit
The Repair Edit screen allows you to mark specific tasks or an entire job as done.
To do so:
- Click Services > Find > Job. Enter criteria to find your repair and edit it.
- To mark a specific task as done, click on the Tasks tab, click on the specific task, and then click Done/Undone button. To mark the entire repair as done, enter the completion date into the Done field.
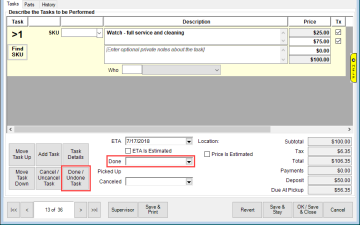
- Save your changes.
Move Envelope
See Locations for more information on setting these up.
See Move Envelope for information on moving job envelopes.
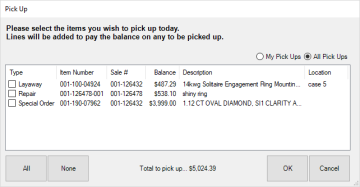
Pick Up
By default, repairs are not available for pick up until all tasks have been marked as done. The "Repairs Pick Up Only When Marked Done" System Option controls this behavior. Changing this will allow you to pick up any repair and, if not previously marked done, the repair will get marked done at the time of pick up.
To complete a Pick Up:
- Open POS.
- Select the customer and click the Pick Up/Finish button. The Pick Up window will appear.
|
My / All Pick Ups
|
Toggle between showing available pick ups for just this customer or for this customer and their spouse/partner
|
|
Type
|
|
A
|
Appraisal
|
C
|
Custom
|
|
L
|
Layaway
|
R
|
Repair
|
|
S
|
Special Order
|
|
|
|
|
Item Number
|
For layaways and special orders, this is the number of the associated item
For service jobs, this is the service job number
|
|
Sale #
|
References original transaction sales number
|
|
Balance
|
Balance due; when picking up The Edge will prompt you to collect this in full before you can finish the sale
|
|
Description
|
Description of transaction
|
|
Location
|
For layaways, case location of item
|
- Check one or more transactions to pick up and click OK. A sale line will appear for each pick up selected.
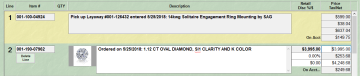
- Continue with sale or, if complete, enter payment details and click Done.