The Edge allows you to assemble new items from existing inventory while retaining full details of the individual parts involved. It also allows you to disassemble items into their component parts while keeping a record of the original piece. Part records are automatically cross-referenced in the software so that if you look up an item that has been consumed as a part towards an assembled piece, that part item will have a link to the final piece and vice-versa.
Check your System Options to ensure these features are turned on.
Steps for Creating an Assembled Item from Scratch
To create a new item assembly:
- Navigate to Inventory > Items > Assemble. The New Item screen will appear with the Parts tab open.
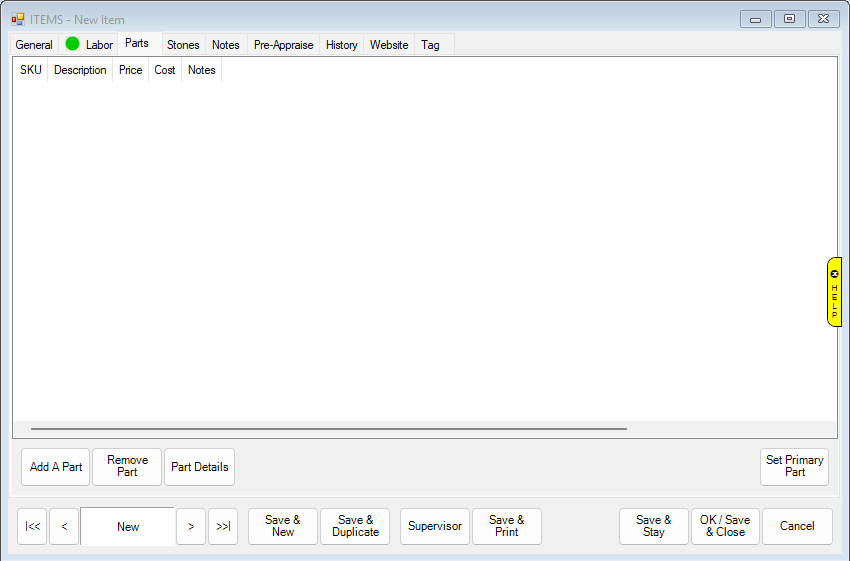
Options in the Parts tab include:
|
Add A Part
|
Allows you to add a part that is required for the assembly.
|
|
Remove Part
|
Allows you to remove a part from the list.
|
|
Part Details
|
Allows you to view the part details entered when the part was added.
|
|
Set Primary Part
|
Allows you to indicate that a part is primary to the piece.
|
|
Save & Print
|
Contains options for printing documents for this item..
|
- To add a part, from the New Item > Part tab, select Add a Part. The New Part window will appear.
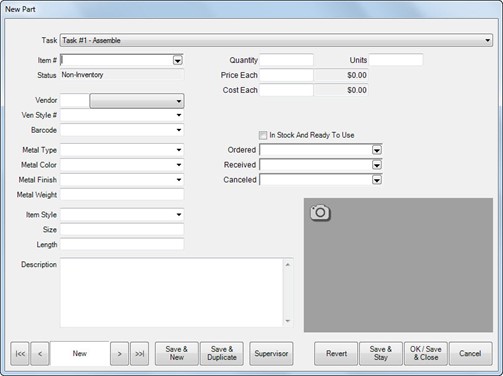
Fields and options in the New Part screen include:
|
Task
|
Labor or other task associated with working with this part. Each part must be associated with the task that first attaches the part to the finished item.
|
|
Item #
|
If an inventory item, the item ID for the part.
|
|
Status
|
Whether the part is in inventory.
|
|
Quantity
|
The quantity of the part required for the assembly. The second quantity field is only used when measure is involved. When using melee diamonds, you would specify both the number of stones (quantity) and the total weight (measure).
|
|
Vendor
|
The vendor from whom the part is to be obtained.
|
|
Price Each
|
Pricing information for this part. They will automatically populate for inventory parts and will need to be filled in for non-inventory parts. You will be prompted to confirm this. The exception to this is when adding bulk parts as quantity will be required.
|
|
Cost Each
|
The cost of the part. This is populated automatically based on the entries you made. To specify cost for non-inventory items, select Supervisor ► See Cost.
|
|
Vendor Style #
|
The vendor’s style number. Optional.
|
|
Barcode
|
The barcode of the part. Optional.
|
|
Metal Type
|
If made of metal, the metal type. Optional.
|
|
Metal Color
|
If made of metal, the metal color. Optional.
|
|
Metal Finish
|
If made of metal, the metal finish. Optional.
|
|
Metal Weight
|
If made of metal, the metal weight. Optional.
|
|
Item Style
|
The item style (motif) of the part. Optional.
|
|
Size
|
The size of the part. Optional.
|
|
Length
|
The length of the part. Optional.
|
|
In Stock and Ready to Use
|
Used to indicate that this item is in inventory and ready to be part of the assembly job. This box gets automatically checked when adding inventory parts. Optional.
|
|
Ordered
|
Whether the part was ordered. Optional.
|
|
Received
|
Whether the part has been received. Optional.
|
|
Canceled
|
Whether the order was canceled. Optional.
|
|
Camera icon ( ) )
|
Displays photo menu to capture one or more images of the item.
|
|
Description
|
A description of the part beyond the fields described above.
|
When adding a part from inventory, many fields will automatically be populated with the details from the item record you specify. You cannot change them. When adding a non-inventory part, these fields will remain blank. You can fill out as many or as few as you like. The only required field is Description.
- Use the Task drop-down menu to choose which labor task first attaches the part to the finished item.
NOTE: By default, when you create a new assembly item, there is one labor task created called Assemble. It is only necessary to use this drop-down to add additional tasks.
- If an inventory item is to be used as a part, select that item from the Item Number field. You can enter the item number directly or select from the Item Number drop-down menu. For non-inventory parts, skip this field.
- Complete remaining fields as appropriate.
- Once all part information has been entered, select one of the Save options to finish adding that part.
NOTE: When adding multiple parts, use the Save & New button to save the current part and immediately open a New Part window to add the next part.
- Added parts will appear in the Parts tab. Inventory items will appear with their SKU number while non-inventory items will just appear with their description.
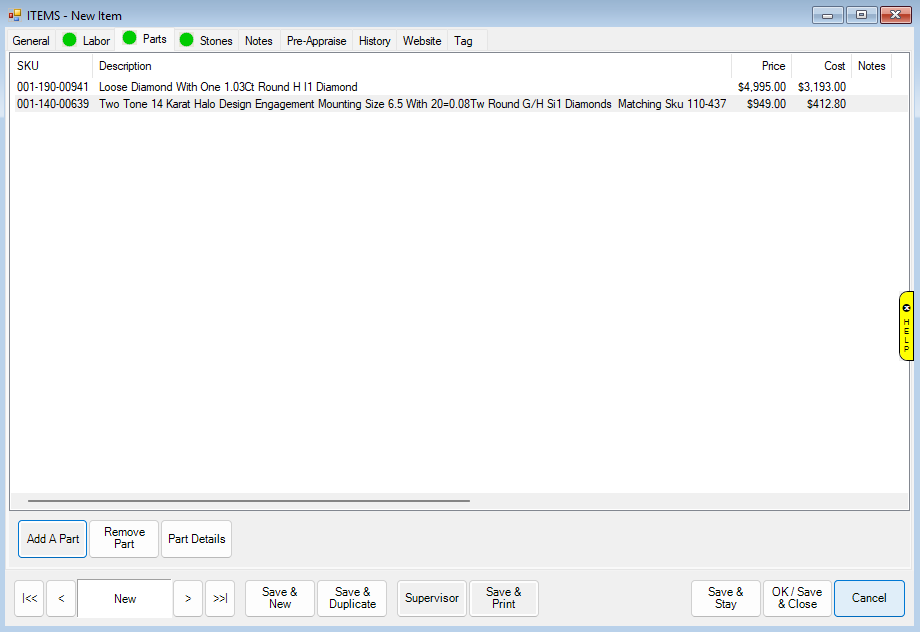
- To access the part details screen, select a part and select Part Details. This window is identical to the New Part window. Use this to make changes to existing parts.
- Use Set Primary Part to specify a part to be the Primary Part of this assembled piece. The Edge will automatically copy key details from the primary part (such as vendor and style). This is optional.
- The Edge allows you to detail and account for the labor required to assemble an item. To add labor associated with a task, select the Labor tab from the New Item screen. It will appear with an automatically generated labor task named “Assemble”.
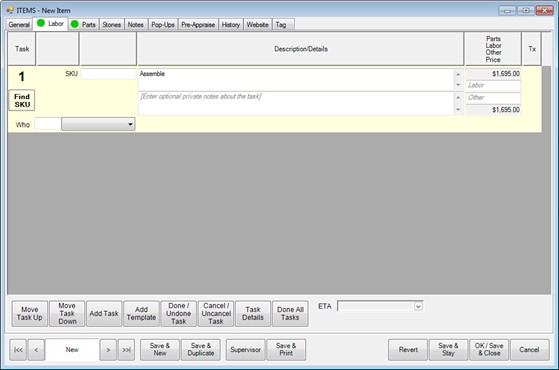
The Assemble task automatically includes a price for the parts (items) being assembled together. You may also specify labor or other pricing associated with this task. The Parts, Labor and Other prices for all tasks will be summed and suggested as a new price for the assembled item when the item is saved. You can add additional tasks to the assembly by selecting Add Task.
Options in the Labor tab include:
|
Move Task Up
|
To ensure chronological order of tasks, use this to move a task up in the list.
|
|
Move Task Down
|
To ensure chronological order of tasks, use this to move a task down in the list.
|
|
Add Task
|
Add an additional labor task.
|
|
Add Template
|
Adds a template to this job. It will add one or more tasks and one or more parts to this job.
|
|
Done/Undone Task
|
Mark the task Done or Undone.
|
|
Cancel/Uncancel Task
|
Remove the task from the list.
|
|
Task Details
|
Opens the Task Details window so you can make changes or add parts for the specific task.
|
|
Done All Tasks
|
Marks all tasks in the list Done and moves it into stock.
|
|
ETA
|
The estimated date the work should be complete.
|
- If there is a labor charge associated with this assembly, you can enter the amount into the Labor field.
- To add specific steps to the labor, select Add Task. A new task line will appear.
- Enter appropriate notes for the task.
- To enter additional details, select Task Details. The Task Details window will appear.
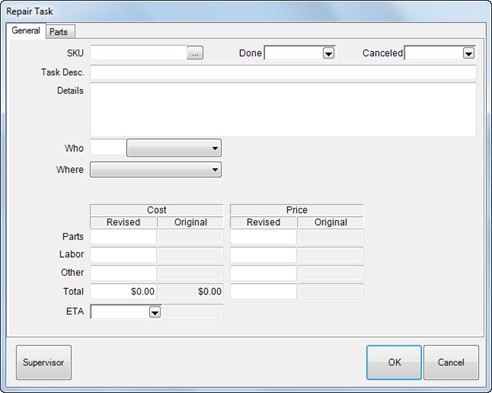
- Make the desired changes, including adding task-specific part information in the parts tab, and select OK. You’ll be returned to the New Item screen.
Though the information appears here, it is also retained on the originating item record to maintain accurate inventory history.
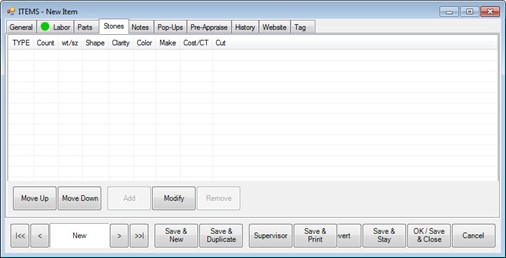
 The Add button on the Stone tab is disabled. You cannot directly add stones to this assembled piece. Instead, any stones must be added under the Assembled tab as a part. We do not recommend using non-inventory items to represent stone parts because they lack the supporting inventory record and therefore the stone information will not appear on the Stones tab of the final assembled item. Instead, you should add the stone to inventory so they can be added as inventory parts. Stones will be moved to the Stones tab after the item is complete.
- After entering part and labor details, you must complete the assembled item entry on the General tab. This is described in more detail in the section entitled Adding an Item. You may complete other tabs described there as well.
- Select OK/Save & Close.
- To save the item as a template, from the Item screen Supervisor menu, after the item has been saved, select Create as a Template and select Save & Close.
- You will be prompted to print an envelope. Select Yes to print an envelope if needed.
On saving this newly assembled piece, all of its parts that came from inventory will have their status changed from In Stock (I) to Consumed (U). Additionally, there will be a new button visible on the consumed part’s item record that links to the assembled piece.
Creating an Assembly Template
Templates are useful for frequently assembled items or items with similar assemblage. All the tasks and parts are imported to the new item, along with the description.
To create a template:
- Open the assembly that you want to make the template (it can be the resulting item record when you completed an assembly).
- From the Supervisor menu, select Create as a Template.
- Select Save & Close. The template will be named after the vendor style number. Certain options in the Item window will no longer be available, but the template will be available for future assemblies.
NOTE: The parts identified in a template are placeholders. You must specify actual parts so they will match actual inventory.