If this is a Bi-Directional integration, EDT supports importing customers, wish lists, and web sales.
View the sections below for detailed steps for importing Wish Lists with Bi-Directional EDT.
Change an Existing Wish List
If the import file contains a wish with a key it will be imported as a change to the existing wish as opposed to creating a new wish.
- You must assign a WebTransferWebID to each wish. This is set in the wish record’s paired WishTransfer object. It must be unique to this wish.
- The import file must be saved in the same JSON format as the export and must match the data schema.
- The import file must be named [Prefix]WishList.json. [Prefix] can be anything you want; we recommend making it numerical and incrementing sequentially, e.g. 1-WishList.json, 2-WishList.json, etc.
- The import file must be copied to the Outbox folder to await EDT processing.
A sample import change is included in the EDT Test Package: 1-CHANGE-WishList.JSON.
To import this change using EDT:
- First, go to Customer > Wish List > Find and click OK.
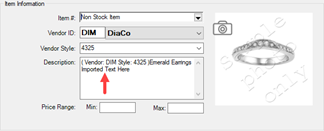
- Edit the Non Stock Item wish for customer ‘Gill Sear’ and note the description says ‘Emerald Earrings.’
- Copy the file 1-CHANGE-WishList.json into the Outbox folder located either in your local folder or on your FTP, depending on how you set up your EDT test environment.
- Run EDT Run Now from your Desktop.
- Run EDT Run Now a second time. The first time you ran EDT, it downloaded the file. The second time, it imported it into Edge.
- Go to Edge and click Customer > Wish Lists > Find, then click OK.
- Edit the Non Stock Item wish for customer ‘Gill Sear.’ The description now includes the text ‘Imported Text Here.’

Importing a New Wish
If the import file contains a wish with no key it will be added to The Edge database as a new wish and assigned a wishlistkey.
There is a new wish sample file included in the EDT Test Environment called 1-NEW-Wishlist.json.
To import this new wish using EDT:
- First, go to Customer > Wish List > Find and click OK.
- Notice that while there is a wish for customer ‘Judy Bagwell’, there are none for customer ‘Bill Bagwell.’
- Copy the file 1-NEW-WishList.JSON into the Outbox folder located either in your local folder or on your FTP, depending on how you set up your EDT test environment.
- Run EDT Run Now from your Desktop.
- Run EDT Run Now a second time. The first time you ran EDT, it downloaded the file. The second time, it imported it into Edge.
- Go to Edge and click Customer > Wish Lists > Find, then click OK.
- You will now see a new wish for customer ‘Bill Bagwell’ at the bottom of the list.
Required fields and acceptable values (other fields optional):
- WishlistCustKey = Edge customer number, e.g. 001-00001
- WishlistStore = 1
- WishlistSeq = 1
- WishlistItemKey = the string ‘Non Stock Item’ OR an Edge item number
- WishlistAssociate = 1
- WishlistUpdateStore = 0
- WishlistUpdateStation = 0
- WishlistUpdateUser = 0
- WishlistUpdateSeq = 0
- WishlistXfer = 0