Definitions for all the fields, buttons, and options on the Purchase Order record.
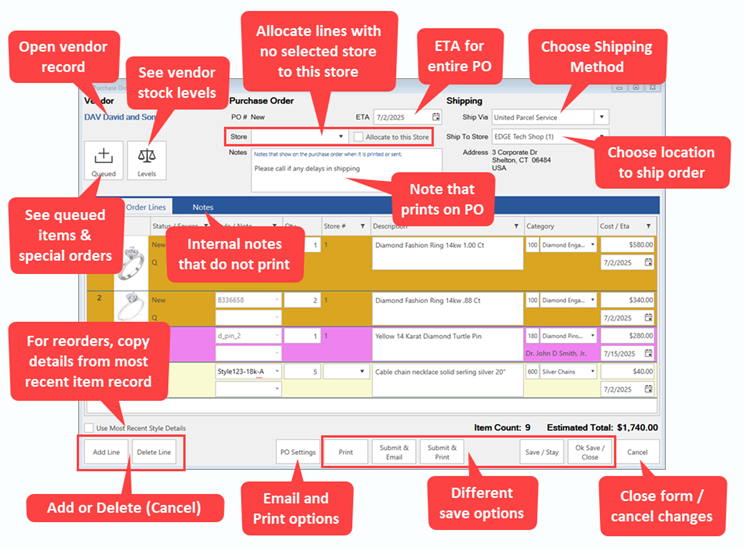
Fields, buttons, and options are divided into three sections: top, middle, and bottom.

The Top section contains Vendor, Purchase Order, and Shipping details.
|
Vendor
|
Click on the vendor’s name to open the vendor record.
|
|
+ Queued
|
Open the Retrieve Queued Items and Special Orders window to select queued items to place on this PO.
|
|
Levels
|
Opens the vendor’s style Levels in a separate detached window. This gives you a snapshot of current inventory levels to help in making purchasing decisions. You can also add styles to the PO from this window.
|
|
Submitted As
|
Once submitted it will display whether this was Printed or Emailed and will display the date it was last submitted.
|
|
PO #
|
The Edge number for this PO.
|
|
ETA
|
The ETA for this PO. Items added to the PO will default to this ETA, but you can override on a per line basis.
|
|
Store / Allocate to this Store
|
Multi-Store only: Use this drop-down and checkbox to select a store that will be assigned to all PO lines that do not have a store assigned.
|
|
Notes
|
Notes that will print on the PO. This is different than the Notes tab which saves internal notes that do not show on the PO.
|
|
Ship Via
|
Select the shipping method from the drop-down or type one in. To edit the drop-down list, see Purchase Order: Setup.
|
|
Ship to Store
|
Select the location where the vendor will be shipping the order. You must create a Shipping Record for each location. To create or edit these see Shipping Records.
|
|
Address
|
The address of the selected Ship to Store will display here.
|
The Middle section contains two tabs: Purchase Order Lines and Notes. The first tab contains the styles being ordered while the latter is used for internal notes/pop-ups.
|
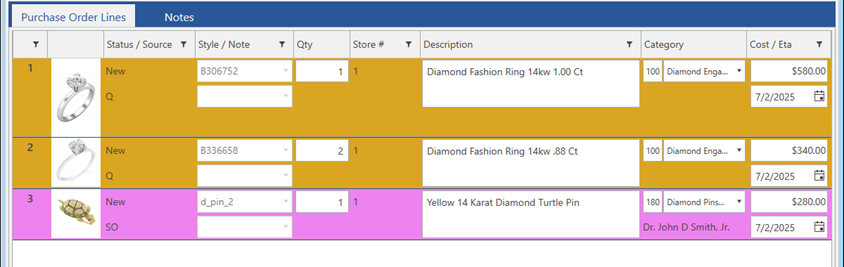
PO Lines
|
A separate PO line is created for each style. It is possible to add the same style more than once. This might be because you are fulfilling a special order and ordering the same style for stock, or for a multi-store you could be ordering styles and locking down store allocations (remember leaving store blank lets you pick when you receive).
Lines on the PO are color-coded:
|
Orange
|
Queued (Q)
|
|
Purple
|
Special Order (SO)
|
|
Yellow
|
New / Entered (Saved on PO)
|
|
Salmon
|
Canceling, but not yet saved
|
|
Pink
|
Canceled
|
|
Grey
|
Currently selected line
|
|
|
Status
|
|
New
|
Not saved. Exiting without saving will remove these lines.
|
|
Entered
|
Saved, but not ordered.
|
|
Canceling
|
Set to cancel, but not yet saved. Exiting without saving will abort the cancel.
|
|
Canceled
|
Canceled.
|
|
Ordered
|
Ordered using Submit & Email or Submit & Print.
|
|
Partial
|
Partial quantity received.
|
|
Filled
|
Full quantity received.
|
|
|
Source
|
|
Q
|
Added from Queued Item list. See Queuing Items for Order for details on how items get queued.
|
|
SO
|
Added from open Special Order list.
|
|
<Blank>
|
Added using the Add Line button.
|
|
|

|
For reorders, this button opens the Copy Details window where you can select which version of the item to copy all details from.
|
|
Style / Style Note
|
The vendor style number and substyle/note.
|
|
Qty
|
The quantity to order.
|
|
Store #
|
Multi-Store Only: Assign a store or leave this blank to assign when receiving the order. Assigning a store locks it in. This will be locked on Queued Items if a store was selected when it was queued. Special Order items will be locked to the intake store.
|
|
Description
|
The style’s description.
|
|
Category
|
The style’s category. For special orders, the customer’s name will appear under the category.
|
|
Cost
|
The style’s cost.
|
|
ETA
|
This line’s ETA. ETA defaults to the ETA used for the entire PO but can be changed on a per line basis.
|

The Bottom section contains buttons and options for interacting with the PO.
|
Use Most Recent Style Details
|
When reordering styles, check this if you want the system to always copy details from the most recent item of that style on file. Uncheck this if you prefer to manually select the item to copy from (the Copy From window will pop up after you select the style).
|
|
Add Line
|
Add a new PO line. If this is a style that’s never been in inventory before, enter its details now, otherwise select or enter an existing style to copy its details.
|
|
Delete Line
|
Only available if the PO has not yet been saved, this will completely delete the selected line.
|
|
Cancel Line
|
Only available once the PO has been saved, this will mark the selected line for cancellation and its status will change to ‘Canceling’. The line will not be officially canceled until you save the PO. Closing out without saving will abort the cancellation.
|
|
PO Settings
|
Contains settings split into three tabs:
Basic – Shows Shipping details from the selected Ship To Store.
Email – Shows email details and allows you to specify a CC and BCC.
Printing – Controls what prints on the PO.
|
|
Print
|
Saves the PO and displays a print preview. Does not mark it ordered.
|
|
Submit & Email
|
Saves the PO, marks it ordered, and emails it to the Purchase Order email on file for the vendor. The PO details display in the contents of the email rather than as an attachment.
|
|
Submit & Print
|
Saves the PO, marks it ordered, and displays a print preview where you can physically print it, save it as a PDF, email it as a PDF attachment, or save it as an Excel file.
|
|
Save / Stay
|
Saves the PO. Does not mark it ordered.
|
|
Save / Close
|
Saves the PO and closes the window. Does not mark it ordered.
|
|
Cancel
|
Closes the PO; does not save any pending changes, such as line cancellations.
|