You must specify a location for the data to upload. This can be a local folder on the computer, FTP site, or both.
For testing purposes, we are going to set it up to work with local folders. If you want to test with your FTP site instead, enter your credentials (FTP Server, Username, Password) and ensure Send FTP is checked rather than Send Local. All other instructions and functionality are the same between local and FTP use.
- Launch EDT using the EDT Interactive icon.
- Click on the Configuration tab.
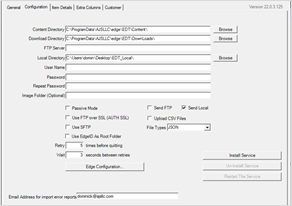
- The Content and Download Directories are created automatically. Leave these at the default paths.
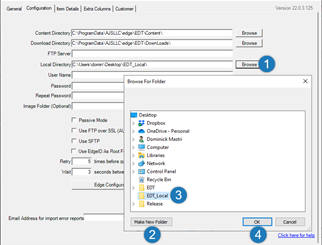
- Click the Browse button next to Local Directory. Use the Make New Folder button to create a new folder called EDT Local on your Desktop, then select this folder and click OK.

- Check Send Local.
- Set the File Types drop-down to JSON.
- Enter your email address into the Email Address for import error reports field at the bottom. Your screen should now match this.

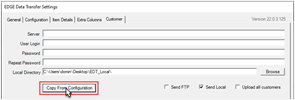
- Click on the Customer tab.
- Click the Copy From Configuration button.

- Click Save & Stay.
- Click back on the Configuration tab.
- In the lower right, click on the Install Service button. A Command line window will appear stating it is installing. Allow this to complete.
- Verify it installed successfully. It should match the screenshot.

- Click Cancel to close OR click Save & Stay and continue onto the next section to perform your first export.